Showing posts with label NOTD. Show all posts

Tuesday, 17 February 2015

NOTD: Ciate Paint Pot in Snatch

It's been so long since I did one of these but here goes!

Ciate Paint Pots Long Lasting Full Coverage Nail Enamel - Two coats - Ciate available here


Ciate is such a great little brand and perhaps best know for their amazing Advent Calendars.

I picked up this colour, Snatch 038 a little while ago and love the colour. A real bright postbox red, it's such a showstopping colour that gets noticed every time.

Ciate Paint Pots Long Lasting Full Coverage Nail Enamel - One coat - Ciate available here


The formula is smooth and not too thick or thin, with a slim brush that can get into edges easily. I personally like the shape of the bottle and find it easy to hold. This only needs one coat but I've shown pictures of both one and two coats just to show you how opaque it is with one coat. It is advertised as a full coverage nail enamel and there is no denying that this is true!

Durability wise, it could do with being topped up with a clear topcoat to prevent chipping as it does tend to come off around the base and tip, but I love the colour so much I can get over it.


Friday, 19 September 2014

NOTD: MUA Nail Varnish in Shade 2 Black

Another one of my little treats, this was an impulse buy in Superdrug at just £1 as I was looking to replace my old bottle of black nail polish.

MUA can be really hit and miss, with some products performing as well as designer brands such as Bobbi Brown and others missing the mark. Which category does this nail varnish fit in?

MUA Nail Varnish from here

I applied one coat of this varnish and was surprised at how easily it went on. The lid is quite easy to hold and the brush is a good size that doesn's shed. One coat seemed thick enough so I didn't go in for a second. However, although the polish was thick enough to cover the nail with a good opaque coat, it still left gaps in the polish where it didn't cover the nail. Also, within a day I'd already started to see chips and wear on the nail tip, as pictured.

Although it is a great price and easy to use, the bottle itself is a little small at 6.2ml and it chips far too quickly.

However, I have noticed that MUA has stopped selling this particular polish and the new polishes come in much nicer bottles and have I assume been reformulated. I'd still be tempted to try out the new nail polishes especially the Essie dupes and hopefully this was just a one off.


Friday, 4 July 2014

NOTD: Revlon Colorstay Longwear Nail Enamel in Sandy Nude

Running into Poundland for some essentials the other day, I also grabbed a bottle of this Revlon Nail Enamel.

Retailing at £7.99 in Boots, the price is unbelievably good for such a well known brand.

Revlon Colorstay Sandy Nude available here

Sandy Nude is a pale, peach toned nude from Revlon's Colorstay range:

"Colorstay nail color formula is fortified with unique ingredients that provide high impact color and gel-like shine in fashion forward range of shades and finishes. This technology is based on a unique combination of resin and high molecular weight polymers designed to provide flexible, shatterproof color with excellent color retention and gloss."

It also promises "Gel-Like shine and up to 11 days of shatterproof color when worn with Colorstay™ base & top coats."

Applying two coats over my OPI Natural Nail Base Coat, I found the consisntency to be too watery, making it difficult to get a neat finish and leaving polish pooling around the edges of my nails. Because it was so thin, it was also difficult to get an opaque finish and I ran out of time after the second coat, even though there were still areas that needed covering.


I did like the glossy finish however and it does seem to last quite a while. After 6 days wear it is peeling at the base and there are a few chips on the surface from knocks, but at least 3 nails look pretty perfect! 

Overall, I really disliked the consistency, which coupled with the wide brush (which would be gret otherwise) made a professional finish impossible. I do love the pale nude colour though which is perfect for lighter skin tones as a go to nude. 

Have you guys ever used this nail polish? Do you think it may have been an older bottle?

Tuesday, 3 June 2014

NOTD: Urban Decay Nail Color Chaos and Urban Decay Launch in Selfridges Beauty Hall

Following on from my review of Urban Decay Bang, here's this season's other standout nail colour, Chaos. 

A tough, opaque, vivid blue, Chaos is an intense and highly pigmented nail polish and perfect pairing with the new Electric Palette.

A real cobalt blue, like Chaos, the formula is smooth, the brush is thin but precise and the bottle itself is seriously sexy. I love the quality of these polishes and would definitely purchase them again. Even better, they are toluene, formaldehyde or DBP free. The colour is much more accurate in the first picture.


Urban Decay Limited Edition Nail Color in Chaos available here

Speaking of Urban Decay, the brand hosted a special event this evening at Selfridges Birmingham Beauty Hall. Working with a UK grafitti artist on a live canvas spray, guests were able to have a picture taken in front of the finished canvas and come back for a complimentary makeover. 


If you've been to Selfridges Birmingham recently, you may have noticed it's had a shiny new makeover. Now twice the size, it's home to new brands including Charlotte Tilbury, Tom Ford Colour and Chanel Espace. 


Urban Decay is known for experimental shades and innovative, high performance products. Established in the mid 1990's, Sandy Lerner, David Soward and Wende Zomnir unleashed a 
line of lipsticks and nail enamels inspired by seedier facets of the urban landscape. 

Producing one of the biggest shade ranges in the industry as well as the cult Naked Palettes, I can't wait to try out more of the range, in particular the Naked Complexion foundation.

Keep an eye out for more reviews coming soon!

Monday, 5 May 2014

NOTD: Urban Decay Nail Color Bang

Before I even start talking about the nail polish itself, can we all take a moment to appreciate the fabulous bottles? Yes, they're tall and skinny, yes they feature a lush mirrored bronze applicator lid, but they also feature mini skulls on the top, that's right, mini skulls. Genius.

Urban Decay Limited Edition Nail Color in Bang* available here
The Hype

"Ultra-sophisticated and EXTREMELY limited edition, these decadent (and very UD) colors feature complex shade work, super-rich pigments and dynamic micro-sparkle. Long-wearing and chip-resistant, our formula has a high-gloss finish that's tough and durable, yet flexible. And each shade is 3-free - formulated without toluene, formaldehyde or DBP."

One coat

The Verdict

Anyway, back to the nail polish itself. Named bang, this vibrant orange shade is bright and loud in the bottle, and yet once on appears to mellow out. The polish is infused with a very subtle micro particle glimmer than is difficult to see once on the nail, but visible in the bottle, and the brush is super-thin, for a mess-free application.

A truly tangerine shade, the pigment was so dense that even after one coat, nails look done. This glides onto the nail easily and after a second coat, is glossy and vibrant.

Two coats
Overall

Besides the dressing table worthy bottle, the super quick and easy application, speedy drying time and an intense, pigment rich formula make this one of the best nail polishes I've ever tried. I adore this colour and it will look perfect on toes with a tan!

At £10 for 9ml, the price point is pretty average for a premium brand.

Have you ever used an Urban Decay nail polish?

*PR Sample

Wednesday, 12 February 2014

Beauty UK Posh Polish no 3 Sunstone - Gemstone Collection

Beauty UK is a brand that I've seen around a few places and I bought this polish from Superdrug.

Beauty UK Posh Polish in Sandstone available here 

I think it was on 3 for 2 and you'll see that I went for 3 colours from this collection that I'll be sharing with you soon.

A pink metallic shade, I went for 2 coats to achieve this finish but could really have done with 3 for a more opaque effect. It dried out really fast like most metallic polishes and I didn't use a topcoat. Next time though I will be using a topcoat as this chipped by day 2! For £3.49, just a touch cheaper than a Barry M polish, I think I'd still expect it to last a bit longer.

The colour is really pretty though, a light pink silver metallic and I do think it's very wearable and versatile for any outfit.

Monday, 3 February 2014

Monday Manicure: Barry M Vivid Purple

Rifling thorugh my nail polish collection the other day I came across this colour. I've had it for ages but never thought to do a NOTD, so here goes.

Barry M Vivid Purple available here

Barry M Vivid Purple no 161 is a exactly that, a vivid purple. With a super shiny metallic finish, it only needs two coats for a thick opaque finish and lasts around 4 days before looking worn. It doesn't even need a top coat and the polish itself is thick but not gloopy.


I'm not really a purple polish fan these days but I do think this is a lovely colour and a bargain at £2.99.

Monday, 14 October 2013

Monday Manicure: OPI Nail Lacquer Sparrow Me The Drama

You know you have a nail polish addiction when you find polishes that you can't even remember buying. This is one such polish. I have no idea where it came from but hey, it's in my collection now so let's go with it.

OPI Sparrow Me the Drama Nail Lacquer

OPI's Sparrow me the Drama is part of the Pirates of the Caribbean Collection. I think it came out a while ago but you can still buy it, probably for a fraction of the price.


What suprised me most about this pink polish is how wearable it is. Most pinks are girly and loud and scream "look at me!" This one however is so subtle that you could even, dare I say it, wear it to work or even an interview. A dusky, creamy, pastel pink, this is both femininie and sophisticated. I used three coats but you could easily get away with two. I think it's quite a cool tone and it really suits my skin tone, even though I've seen it work on paler skins too.

As always the quality of these polishes is fantastic, no streaking, bubbling etc.

Monday, 2 September 2013

Monday Manicure Nails Inc Bluebell & Models Own Blizzard

Models Own Blizzard available here

Nails Inc Bluebell

It's two for the price of one on today's NOTD!

I wanted to try out Models Own Blizzard* and paired it with this special edition polish from Nails Inc for InStyle called Bluebell.

It's such a beautiful colour it's a shame they didn't add it to the mainline, but looking on the net it looks similar to Models Own Blueberry Muffin and Beth's Blue, Revlon Charming, Barry M Blueberry Ice Cream and Essie Lapis of Luxury, although none of them seem to match the incredible violet undertones of this polish.

I used three coats to get a very full coverage although you could get away with two. The colour is more than just a pastel, baby blue colour. It's really a purple blue, with lilac/lavender/purple tones, dries really quickly, and wears really well with a topcoat.

Models Own Blizzard is a very densely packed, highly reflective silver hexagonal sequins and tiny silver specks. It is very thick but that means that one coat gives you the freedom to move the polish around on your finger to get the right look.

I love this colour combination too, somehow reminds me of winter, snowflakes and Mr Frosty!

Keep your eyes peeled for reviews of the rest of the Models Own trio :)

Monday, 26 August 2013

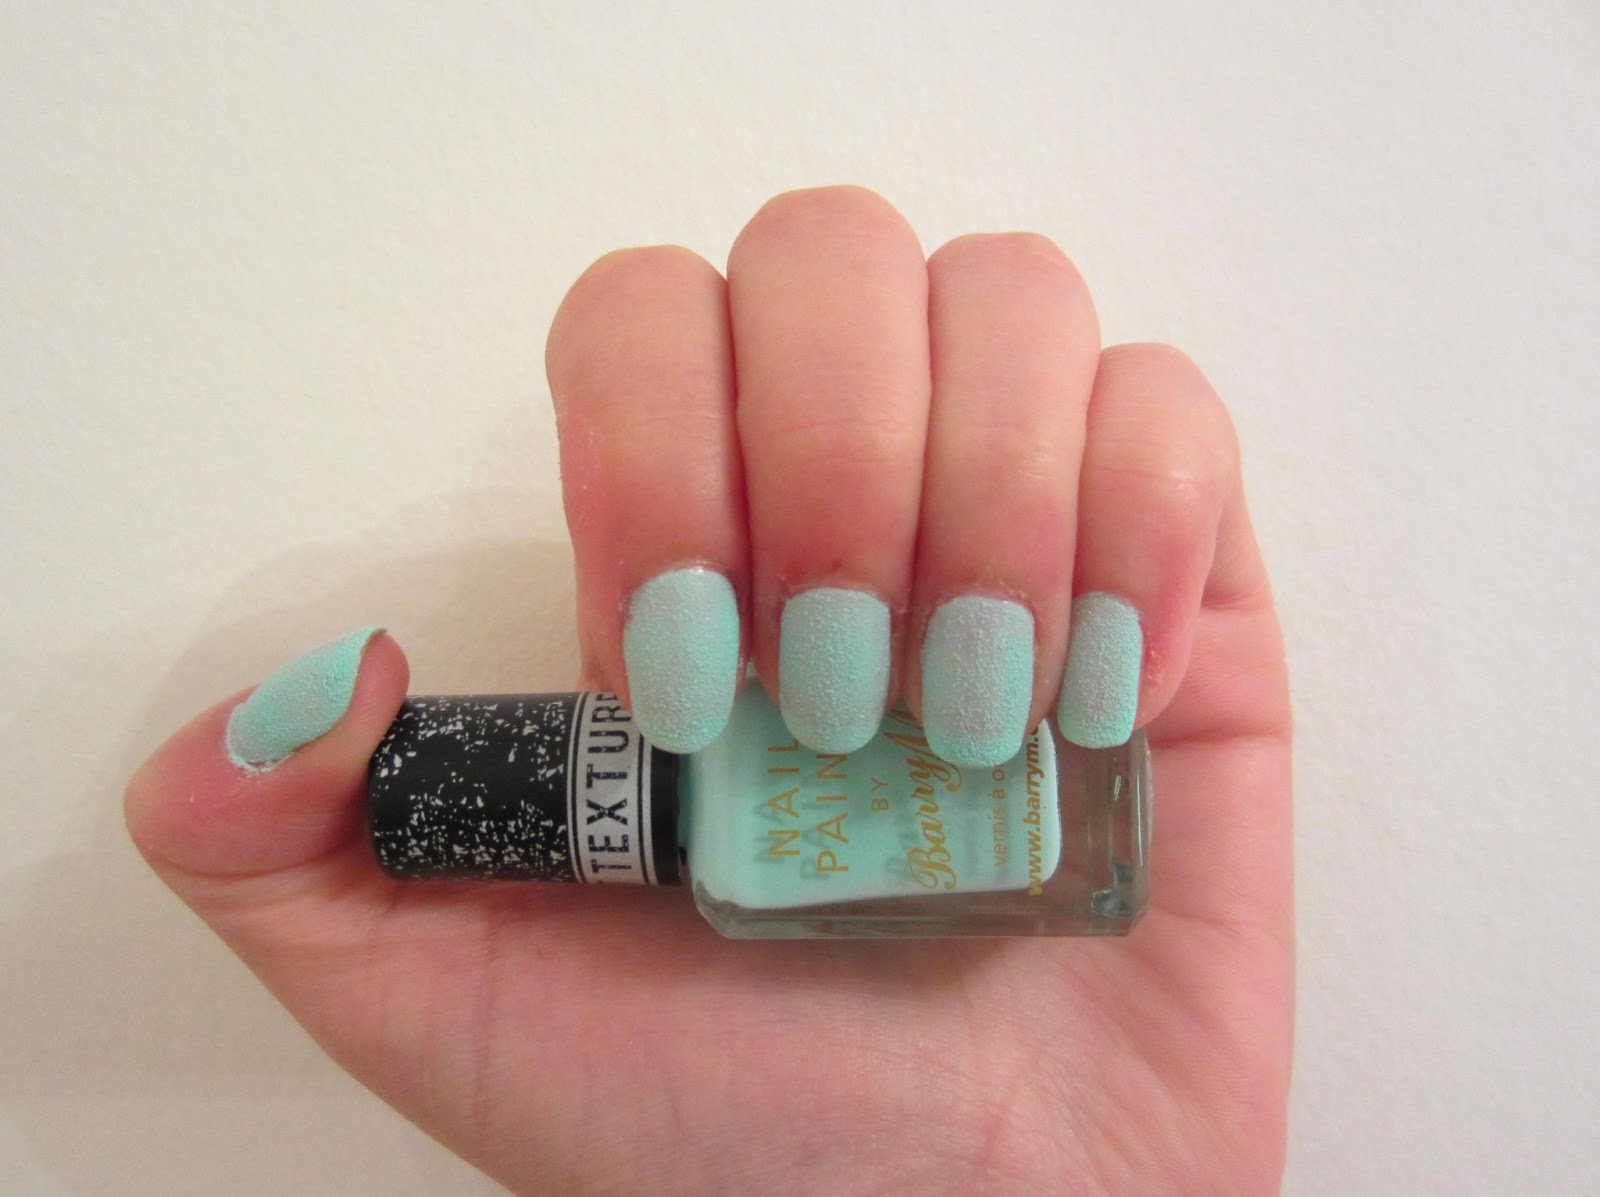
Monday Manicure Barry M Textured Nail Effect Nail Polish Ridley Road


Barry M Textured Nail Effect 2 coats (taken at night)

Barry M Textured Nail Effect 1 coat (taken in the day!)

As you saw in my birthday present haul post, I was really lucky to receive this as a gift*. The textured nail effects from Barry M are a much cheaper dupe of the Nails Inc concrete nail polish. I haven't tried the Nails Inc, but here's my thoughts on the Barry M version.

First off, I adore this colour! Pastel mint green nail polish is one of my favourites and Nails Inc Haymarket in particular. This however has got to be the most perfect mint colour without too much blue interfering with the pastel yumminess. Also, I actually think this shade works better in this matte finish than it does in a gloss. But I digress.

I've shown you a picture of how it looks at one coat and how it looks at two. I've heard a lot of bloggers say that they thought it needed three coats to get a good finish, but I was happy with two. 

The effect is really weird. To me, it almost felt like I was wearing falsies because my nails feel so alien! It's almost like sandpaper but not as scratchy :)

The only think to be careful of is that they mark really easily and mine ended up a bit grubby because my makeup rubbed off onto it.

The colour goes on smooth and then dries to this effect, I have no idea how but it's magic! Also, it dries pretty quickly which is always a bonus.

Overall I really love this polish for a special event or night out especially. At £3.99 I think it's definitely worth trying out and it's a fun way to experiment with colour and texture.

Have you tried any textured nail polishes?


Monday, 19 August 2013

Monday Manicure: Barry M Gelly Nail Paint Papaya


Barry M Gelly Hi Shine Nail Paint in Papaya* GNP13 available here

You might have spotted this little number in my Birthday Present post, can you tell that everybody loves Barry M? I didn't even ask for nail polish or Barry M but my friends must know me too well because everyone who bought me polish bought me Barry M!

I digress, I've already tried out the Watermelon shade which is the darkest Gelly shade available, now onto a much more summery colour. Papaya is a fabulously fruity peachy orange shade with a high shine finish. I could have used 3 coats to get a better finish as this wasn't perfect at 2 coats and a base coat.

I adore this colour, I think it's perfect for high summer and the colour is literally juicy. It came off really easily too and lasted just under a week. These are such good value it looks like I'll be working my way around the entire Gelly range at this rate.

Which is your favourite shade?

Monday, 12 August 2013

Monday Manicure: Barry M Magnetic Nail Effects in Magnetic Violet Product Review

Hi guys! So this post is going to be a bit different, in that it's both a Monday Manicure and a product review.  I'm ashamed to admit it but this is the first time I've tried out a magnetic nail polish. They've been around for a few years now but I just didn't feel compelled to buy one. However, one of my fab friends got me this for my birthday and so I've finally had the chance to try it out for myself.

Barry M Magnetic Nail Effects in Magnetic Violet* NP329 available here

The hype
Magnetic polishes have been around for a while but in researching this post, I learnt a lot. For a start, I had no idea that they come in different patterns. The panels on the magnetic top (in this case the horizontal lines) are actually a representation of the effect the magnetic will leave on your nails. In the Barry M range for example, there's chevrons, stars, waves, diagonal lines and more to choose from. What's even more fun is that you can swap the lids around and use them on different coloured nail polishes from the range to get even more colour/pattern combinations!

Things I learnt a) the magnetic lid comes off the actual lid b) the pictures/lines mean something!

How to apply magnetic nail polish
Here's the directions according to Barry M. 

1. Shake the bottle well to ensure magnetic particles are evenly distributed throughout nail paint
2. Apply a basecoat and then apply one coat of your magnetic nail paint and allow to dry
3. Apply second coat and IMMEDIATELY hover the magnet over the nail for 5 to 10 seconds and watch the effect appear
4. Once dry apply topcoat

I followed these to the letter (although I skipped the topcoat to see what the finish is like and I heard some topcoats don't agree with these polishes and destroy the effect) and here's what I ended up with.


Troubleshooting
A few commonly made mistakes with these polishes are:

Holding the magnet too close to the nail (smudge alert!)
Not holding the magnet close enough (no chance of the pattern coming through strong enough)
Moving the magnet whilst holding it to your nail (this creates a weak/blurry pattern)

Results
As you can see, my nails didn't come out perfectly. For a start, the design didn't cover the whole nail because my nails are quite domed which means I need to try and move the magnet around the whole nail (side to side rather than just directly above). Also, how close you hold the magnet to the nail makes a difference to the pattern, as it will be darker and stronger the closer you hold it to the nail.

For a first attempt I don't think this is too bad but I'm definitely up for trying out some different shapes and colours especially. I also heard that you can use normal magnets on these to give different shapes. Cue me going to the fridge and testing out about 20 different magnets to see if it's true. Well, whilst the small round/square magnets just created a bid splodge in the centre of the nail, the larger ones were pretty impressive, creating horizontal, vertical and diagonal lines. The larger block magnets (where the whole of the back is covered in a magnet) even gave lots of really thin lines. Definitely worth a try!

How have you guys been getting on with magnetic nail polish?

P.S - If you're not interested in the magnetic effect and just want to see what the colour looks like on its own, this one's for you!


Monday, 29 July 2013

Monday Manicure: Chanel Rouge Noir - A Classic

Chanel Le Vernis Nail Colour in Rouge Noir 18 available from here 

Rooting through my collection the other week I realised that I'd somehow missed this classic nail polish from my regular NOTD posts. Chanel Rouge Noir is undoubtedly the Rolls Royce of nail polish. Made famous by Uma Thurman who famously wears the shade in the film Pulp Fiction, the shade is meant to look like dried blood (nice). A mix of red and black, the shade has cult status and was the first premium bottle of nail polish I ever purchased.

Here it is on my nails for you guys, I used two coats and sealed it with Seche Vite although I got some extreme shrinkage from it!

The colour is so sophisticated, a real grown up look and at £17.50 for a bottle it is a definite investment shade. In truth, I've had this bottle for years and it's still going strong.

What was the first bottle of nail polish you guys bought?

Monday, 22 July 2013

Monday Manicure: Nails Inc St James

Nails Inc St James available here 

St James is a colour I've had in my collection for quite some time but I've never actually shown it to you guys. Although it's described on the Nails Inc website as a pillarbox red, I think you'll agree that there is far too much pink in this shade to really call it that. I have however seen other bloggers say that with three coats it turns out a lot more red so definitely worth a try.

As always, I used a base coat and two coats of colour to get this look. The application on Nails Inc is usually really good and this one didn't disappoint. Easy to apply with a nice shiny finish, what's not to love? I love this colour as an alternative to a traditional red and would definitely recommend it to anyone who wants a lighter red for summer.

What do you guys think?

Monday, 15 July 2013

Monday Manicure: Ciate Paint Pot Gold Digga 030


Ciate Paint Pot Gold Digga available here

I've been on a bit of a Ciate spree lately, here's my latest from Ciate, a rich bronze gold shade called Gold Digga.

In the bottle this looks like a real molten gold colour with warm bronze/copper tones. The colour looks great on tanned hands.

In the pictures I've used two coats but honestly, there's no difference in appearance between one and two so you can definitely get away with just the one coat. Not only that, but this is dry in such super fast time that it's the perfect polish to keep on hand for those emergency nail polish applications when you need to be out the door in 10 minutes!

This gives great coverage, a great application and has a wide brush meaning you only need to use one stroke to cover the nail and the long thin handle is easy to hold.

Verdict? Perfect for fast applications and summer nails.

Monday, 24 June 2013

NOTD Monday Manicure ELF Nail Polish Golden Goddess


ELF Nail Polish Golden Goddess available here 

£2.50 for 10ml of nail polish? Madness!

Golden Goddess is a glitter topcoat infused with small glitter specks and medium hex pieces of holographic golden glitter. I tried this on over Ciate 3am Girl and got an unexpectedly great result.

The polish itself is fab as a topcoat. The glitter is evenly dispersed and you get a good coating of glitter all over rather than just a few random pieces.

Against this midnight blue colour, it reminded me of a starry night, ahhh.

Fab polish at a fab price.

Monday, 17 June 2013

NOTD Manicure Monday Ciate Paint Pot 3am Girl

Ciate Paint Pot 3am Girl available from here 

Dark nail polish always looks chic. Gone are the days when you’d be ridiculed with goth girl jibes as black colours are now chic!

Onto the review, Ciate Paint Pots are really well known and weigh in at £9 for a 13.5ml bottle.

This shade is called 3am Girl (raunchy) and although it looks black in the bottle, is actually a very dark navy black shade. It’s incredibly similar to Nails Inc Convent Garden.


I’ve shown you what it looks like with 1 coat and as you can see it’s definitely a 2 coat polish! With one coat it is a little streaky and has more of a blue tone to it, which turns out more black with 2 coats.

This is a great colour and an interesting alternative to black. I got quite a few compliments on this too. It lasted really well, no chips for around 5 days which is pretty good going.

Overall I’m loving Ciate and will keep adding to the collection!


Monday, 10 June 2013

Manicure Monday: Nails Inc Nail Polish Porchester Square

Nails Inc Nail Polish Porchester Square available from here 

See that Hero Shade sticker on the bottle? Yep, you’d better believe it. Porchester Square is one of those colours that had everyone raving when it first came out, and quite rightly so. This is quite simply the perfect mushroom shade for me.  The others I’ve tried have left me looking a but corpse like but this one has just enough lavender in it to suit most skin tones.


Like all Nails Inc polishes, I used two coats to get this finish and I personally love the application and formula. It also has a naturally glossy finish that I adore. A mushroomy shade makes a change from a nude beige and is just that little bit more interesting. Get it or regret it!

Monday, 3 June 2013

Manicure Monday: ELF Nail Polish Fire Coral

ELF Nail Polish available from here 

This is just one item I got from a huge ELF haul a while back. It’s the first ELF nail polish I’ve tried and I was drawn to this reddish coral colour. The colour has got to be my favourite part of this polish. It’s about as far away on the coral colour scale you can get before hitting red.

Application is ok, the brush could be better and doesn’t cover the whole nail and the formula is a little on the thin side.  I’d definitely recommend that you use a topcoat with this one to stop it from chipping and it didn’t last as long as an OPI or Nails Inc polish for example. I’ve heard that the quality of these polishes can really vary from shade to shade so if you’re willing to risk it for £1.50 then have fun experimenting! If not, you can’t beat Barry M :)


What I do love about the ELF polishes is the size, (10ml), value (£1.50) and added benefits to the formula. They are “infused with active Vitamin E for stronger, healthier nails” and are toluene, formaldehyde and DBP Dibutyl Phthalate Free. I definitely think that more companies should be working to remove these chemicals from their products so hats off to ELF.